Pimp my iPad: An interactive documentary experiment

Charles Miller
edits this blog. Twitter: @chblm
Anyone making something for BBC Taster needs to remember its remit is to offer the BBC’s “freshest ideas and experiments”.
I was planning to make an interactive video about business using Touchcast software. But, apart from it being interactive, I wanted to try filming and editing it differently too.
That was how I ended up using an iPad for much of the filming of How to Succeed in Business, and why I started editing on the iPad too (which wasn’t so successful - but more of that later).
Every iPad can shoot video straight out of the box. But if you want something approaching broadcast standard you’ll need to do a bit of shopping.
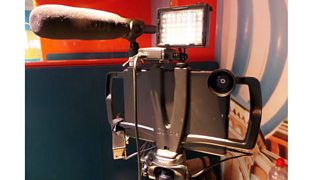
By the time you’re ready the iPad will be encased in a collection of accessories: to hold it steady, record better sound, improve its lens, and even to provide some extra light. You can also improve on the video recorder itself by downloading a specialist app to give you more control over your filming.
Here’s one I made earlier:
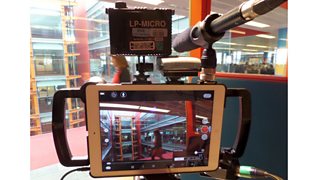
As you can see, the iPad wasn’t quite as simple, elegant and unobtrusive as it once was – but it did now include the ability to record on both standard and radio mics and take a wide angle or zoom lens, amongst other capabilities.
But you don’t need to have all of this stuff out all of the time. When I was getting shots of a contributor in the tube, I put it all in my rucksack, and just used the iPad itself with its internal mic. That meant nobody was interested in what I was doing. In fact my fellow travellers probably thought I was watching a video or reading a book.
I have self-shot before with kit that I could easily move from location to location on my own. But it’s never been small and light enough that I could film while in transit. Being able to fit it all into a rucksack means you have both hands free, which makes all the difference.
The large screen on the iPad was a positive advantage in some situations. Filming my contributor walking down the street, I was able to walk slightly ahead of him with the camera pointing backwards. The size of the screen meant it was much easier to adjust the framing than it would be on a smaller device.
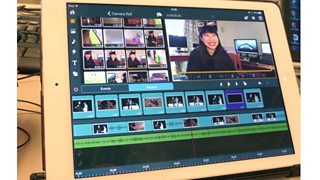
So what about editing? It would have been satisfying to have been able to do the whole project on the iPad, and there are editing programmes you can buy that let you do things like separating audio and video tracks (and for £4.99, you can’t complain). But I found the sheer fiddliness of the touchscreen too annoying after a while.
And by the time I starting needing to import archive footage from different places, and generating graphics, I was not only grateful but wholly dependent on my brilliant editor Alexa Mackenzie - and on Final Cut Pro.
One of the lessons of my first interactive video is that, even if the viewers can skip the interactive bits, the producer and editor can’t. So our 10-minute film with interactive elements (all 26 of them) was more like producing a half-hour film - with additional time needed to set it up as an interactive project.
And there’s another thing I’ve I learnt about online interactive video: we’re going to be able to see exactly how many people have clicked on each link and how long they stay watching.
With a TV documentary there’s information afterwards about whether the audience rose or fell during the programme. But you're not swamped in detail, and if the graph goes the wrong way you can always console yourself by remembering that EastEnders was about to start on BBC One, or come up with some other multichannel excuse. Online, the data is detailed and unforgiving.
But, hey, I’m not worried: I’m sure you’ll want to know How to Succeed in Business - so please click generously.
