What are the key learning points about moulds, jigs and fixtures?
- Moulds, jigs and fixtures are essential for creating accurate and consistent products in manufacturing.
- Moulds shape materials.
- Templates guide cuts.
- Jigs provide stability.
- Fixtures hold parts securely during manufacture.
What is a mould?
A mould in vacuum forming and casting is a structure used to shape materials. In vacuum forming a mould is placed into a machine where heated Plastics which will soften when heated and can be reshaped. is draped over it. A vacuum pulls the plastic tightly around the mould so that when cooled the plastic takes on the exact shape of the mould.
This video explains the processes involved with Vacuum Forming, the easiest way to make hollow plastic mouldings which can be used in a wide variety of RMT design/make projects.
Vacuum forming is used to make plastic housing or components for a wide range of items, from food packaging and masks to helmets and parts for aeroplanes.
Let's take a look at how it's done.
Before we get started here's what you'll need:
MDF or similar material to make your mould
Access to a vacuum former
Some sandpaper
A release agent or furniture polish
Goggles, apron and a dust mask.
And for finishing you'll need a mould cutter or jig saw, as well as a sanding board and wet and dry paper.
The first step is to make an MDF mould or pattern which will be used to shape the plastic.
Your mould will need a few features to work best.
Firstly, it should have a flat base so that it can sit on the platen of the vacuum former. There should be no undercuts so that it can be easily removed from the formed plastic.
Always make sure that any recesses or grooves have a pattern of small holes drilled around the edges. This ensures that the plastic is sucked into the mould rather than being draped across the surface.
Most importantly, the mould needs to have a draft angle, which is an angle or slope of typically 5 to 10 degrees. The draft angle ensures that the mould can be easily removed.
And finally, the surface of the mould needs to be sanded smooth to resist sticking. It can also help if you coat the surface with a release agent or furniture polish.
Now, you can place your finished mould onto the platen in the base of the vacuum former and lower the platen into the machine.
Clamp your thermoplastic sheet onto the seal.
Make sure that the sheet sits on the seal all the way around and that the clamp presses the plastic sheet evenly on to the seal.
Once that's in place, you can turn on the heaters and slide them over the plastic sheet.
At first the plastic will warp as it warms, then sag slightly and then pull tight as it reaches the right temperature and softness.
Now you can turn off the heaters and slide off the lid.
Next, raise the platen with the mould on top, which will press the mould into the soft plastic.
Activate the vacuum pump to evacuate the air, creating the atmospheric pressure which will form the plastic around your mould.
After 30 to 60 seconds, turn off the vacuum. If your machine has a reverse air-flow button, use it now as it will force air back into the mould and help to break the contact between the mould and your plastic component.
And now it's time to trim and finish your plastic item using a combination of a mould cutter, sand paper or sanding board, plastic scrapers, and wet and dry paper.
In casting a mould is a hollow form into which liquid material such as molten metal or plaster is poured. The material fills the mould and takes its shape as it cools or hardens before being removed from the mould to form the final object.
| Advantages of using a mould | Disadvantages of using a mould |
|---|---|
| • Consistent and repeatable production • Efficient for mass production • Enables complex shapes and fine details • Minimises material waste | • High initial cost and time to design and create • Requires new moulds for design changes • Wear and tear may reduce precision and quality over time |
What is a jig?
A jig is used in manufacturing to hold a workpiece in a fixed position while ensuring that the cutting tool moves along a precise path. A jig ensures precise alignment and repeatability. They are commonly used for repetitive tasks where consistent accuracy is required.
| Advantages of using a jig | Disadvantages of using a jig |
|---|---|
| • Ensures accuracy and precision in repetitive tasks • Reduces human error • Speeds up production • Increases consistency in part production • Improves safety by securing the workpiece | • High initial cost and time to design and create • Requires maintenance due to wear over time • Changes in product design require new jigs |
What is a fixture?
A fixture is used to securely hold, support or position a workpiece during machining or assembly operations. Unlike a jig, which guides the tool, a fixture only holds the workpiece in place, ensuring stability and accuracy throughout the process.
Fixtures are designed to maintain the correct orientation and alignment of the workpiece allowing for consistent and precise operations such as drilling, milling or welding.
Examples include vices, and clamps.
How to use jigs and fixtures in a workshop
A jig is a type of custom-made tool used to control the location and/or motion of parts or other tools.
These can be very useful when you need to replicate the same shape or cut over and over again. A jig can ensure they will all be the exact same.
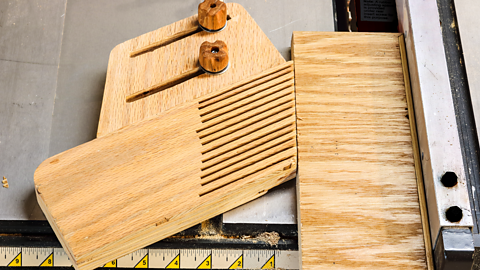
The first example of a jig we have allows you to shape a piece of wood in a very specific way.
Using the jig and the wood plane (not sure of the name for this tool) you can remove part of the wood, leaving you with a small section still in place.
By simply securing the wood in the jig you can be sure that each piece produced will be exactly the same.
Trying to recreate this over and over again by eye would be incredibly slow and even then still not as accurate.
There is an initial time investment with jigs as they need to be built specifically for the job in question. However, this time investment can be well worth it in the long run as you save significant time throughout the entire process.
In our second example, this jig has been created to ensure that the same angle of bend is made on pieces of plastic.
Firstly, we use a hot wire strip heater to soften up the plastic, making it much more malleable.
You can then bend the plastic piece around the jig. Holding it in place until the plastic has cooled down enough to again hold its shape.
Using this jig means that each time you repeat this process you will always end up with the plastic bent at the same angle.
This particular jig has a few shapes that can be created using it. This is worth considering when creating your jig. This means it can be used for more than one specific job.
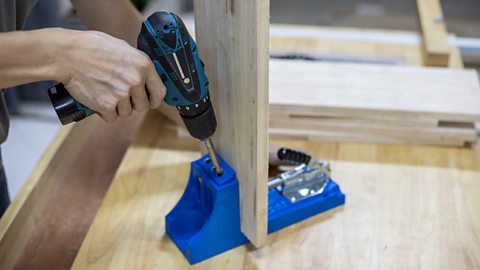
The next jig example is used to hold a piece of wood in place while making the same drill holes over and over again.
The jig is held in place by the table clamp to ensure it does not move.
A drill bit stopper is also in use. This will mean that the same depth of hole will be made by the drill bit each time.
This jig is slightly more versatile than the previous two examples. It can hold different sized pieces of wood in place while you work on them.
In this example, it quickly and securely holds the wood in place while the holes are drilled into it.
The part of the jig that holds the wood in place is shaped that way to allow different sizes of wood to fit in place.
Our last jig example is one that has been made to work with a bandfacer.
It has been made to allow you to shape pieces of wood in a circular shape of the same diameter.
Using this jig will allow you to ensure that each circle create with it will be exactly the same size as the previous ones.
You simply attach the centre of the wood to the jig using the small metal peg.
Then turning the wood around the peg means that you will never remove too much material.
It also means you create a perfectly curved edge.
This would a lot more difficult to produce without the jig shown.
Test yourself
More on Manufacturing - tools and processes
Find out more by working through a topic
- count6 of 7

- count7 of 7