Hi.
The world around us is a greatinspiration for artists. Of course there's many different ways of painting it and today we are going totry quite a few. So let's have alook at what we are going to need. We have got some water colours some acrylic paints we've got lots of different spatulasand sticks including some lollipop sticks different types of pencil lots of different types of paper and some different-sized paintbrushes.
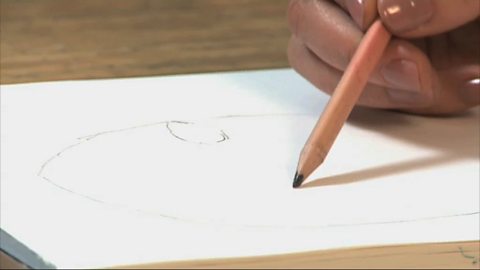
So we're going to start witha country scene. I'll sketch it out in pencil first. I've got the horizon line. Some hills in the background there. These are our lines for the field. A few trees over here. We'll put some ploughed linesfor this field as well and I think I'll doanother tree over here. So now we are going to need a wash. To start with we will need our palette with our watercolour paints. We will put lots of water using quite a big brush because it is going to be a big loose wash and then we will takesome of our blue watercolour paint and mix that in. Not too much - you can always add more. Just darken it down slightlywith some black.
That's perfect.
So now we just wash that overand don't worry if it's a bit messy and you go over some of your trees. If you need to add more paint you can. This is just very loose.
OK. Next I am going to fill in somegreen for one of our fields here. Now we're going to add some detail tothese trees with some acrylic paint. So we're going to mix up some green. For that we're going to needblue and yellow. Take our brush… and mix that in. Mix a bit at a time. You can always add more.
Right. I am going to use our bit ofstick here or maybe our spatula and add our tree detail. So you can see you don't always need to use a brush.
OK. So next we're going to put in a corn field in this field here. So we're going to need someyellow for that. Now we are going to need somegolden yellow paint to do the corn in the field. So we'll just popthis into our palette here. Take our bit of stickand dip it in put plenty on and then we're going to place it andsort of smear it on to make the corn. You'll have to keepdipping it back in so you get plenty onfor each of them. OK so that's that finished. Now we're going to mix some brown. For that we're going to need yellow blue and red acrylic paint. We've already mixed our yellow and blue so we can add a little red to that. Just a little at a time. You canalways add more if you need to. So once we have our brown mixed up we're going to put that bigger brush aside and take a really small brush and we're going to use it toput the detail into the corn field. If we just pick up a littlebit of the brown paint then we're going toput on little dots. Just to give it a bit more interest so it's not just lots ofyellow lines.
OK now that've added all that detail I'm going to work on this tree trunkover here on the right. I'm going to usea different brush here. This one's a veryshort-bristled brush and I'm going to use it to stipple. So that's just dippingit in the paint… and then we're going to dab it on. This gives usa texture like tree bark.
OK so we're going toexperiment with light and dark as well by puttingmountains in the background. So we'll put some shading on themso that they recede into the backgroundand look like they're further away. So we'll go back to our watercolours again pick a dark colour - black maybe a very dark blue - and we'll just wash it in. "Experiment with light and texture see how it changes the mood." I've added a clear pinky washover everything and also shadows round the treesto show that the sun is setting.
"There finished."
"Now let's try some wet paper painting" starting with this thicker paper and a damp sponge. But not a wet sponge - it shouldn' t drip too much when you squeeze it. Now rub it gently over your paper. This can get messy but don't put newspaper underneath your paintingbecause it will soak up the water. If you want to use something use plastic instead. Now I'm going to put some blue paint in my palette. You can use any colour though this is going to be much moreabstract than our landscape painting. And I'm going to use a small brushto dab the paint onto the paper. Not too much. You can see how itsort of spreads out. You might want to water down your paint slightly. Just touch the brush lightly tothe paper and try swirling it around. Remember to dry your painting flat. This avoids it from streaking. Unless of course that's what you're going for.
Use other colours as well. This looks like fireworks to me but it could also be flowers or stars. For a different effect why not use a toothbrush? You can use this to sprinkle paint onto your painting. So I'm going to dab it here in the green paint… and then - this is a bit messy - sprinkle it on to your picture like this. In this one I've used dark paper and sprinkled it with white paint and I think it really does look like stars almost like some of van Gogh's paintings.
Video summary
Using a range of tools including a acrylic paints, water colours, several different sized and shaped brushes, a spatula, a sponge and a toothbrush, artist Emma Majury demonstrates some basic painting techniques, creating first a landscape and then an abstract design.
She takes us through a step-by-step demonstration of how to create a landscape painting using composition sketching, colour wash and colour mixing to create moods and effects within a painting, taking inspiration from the world around us.
She shows how to use different tools such as sticks and spatulas as well as brushes to apply the paint to create different textures on the paper surface, and how applying paint to wet paper can create an abstract effect such as fireworks, flowers or stars.
This is from the series: Schools A&D clips
Teacher Notes
The pupils do an experimentation with different painting techniques, materials and types of paint.
Exploring different effects on wet, dry and textured paper.
Finding out how different materials behave and react with each other.
This clip is suitable for teaching Art and Design at KS1 and KS2 in England, Foundation and KS2 in Wales, Foundation KS1 and KS2 in Northern Ireland and Early and 1st Level, 2nd Level in Scotland.
How to draw a lifelike self-portrait or portrait. video
Draw a realistic portrait using proportion, light and shade and balance techniques.
How to photograph a moving object. video
Basic camera and photography skills needed to photograph moving objects successfully.
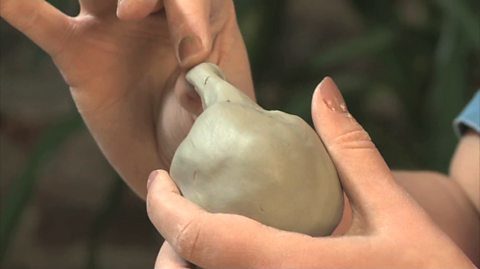
Making sculptures from dry materials and clay. video
A demonstration of how to shape and make dry media and clay sculptures.
Printmaking with different materials. video
Introduction to simple printing techniques using widely available materials.
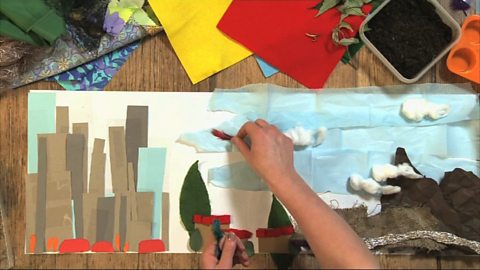
Creating a collage landscape. video
How to use a variety of textured materials to create a landscape collage.