Key points
- Deforming methods such as blow moulding, laminating, and press moulding alter material shapes.
- Reforming techniques like injection moulding and casting create shaped parts.
- Injection moulding makes mass-produced plastic parts, and casting forms complex metal shapes.
- Extrusion pushes melted plastic through a die to produce continuous shapes like pipes.
- Blow moulding shapes hollow plastic items, laminating bonds layers for strength, and press moulding forms thermosetting plastic items.
- Circular saws are used for straight cuts, and band saws are used for intricate curves.
- Jigsaws cut detailed shapes, and sanders smooth surfaces.
- Linishers are used for heavy duty sanding, and planers create uniform wood thickness.
Reforming
Reforming techniques are manufacturing processes that involve shaping materials, typically plastics or metals, by changing their form without removing material. They achieve this by manipulating the material's molten or softened state.
For example, injection moulding and casting are reforming techniques where materials are melted and then forced or poured into moulds to create new shapes.These methods can produce complex, mass-produced items with precision and consistency.
Injection moulding
Injection moulding is used in industry to produce most When the same product is manufactured many times.Plastics are long chains of polymers. A polymer is a large molecule formed from many identical smaller molecules (monomers). Polymers can be natural or synthetic. parts using the following process:
- granular plastic is held in a hopper
- it is moved via an A machine that uses an open-ended screw to move material through a tube along a heated tube, called the heating chamber
- once the polymer has been melted, it is pushed into a mould with a a device that uses fluid pressure to move a piston or plunger - the use of the hydraulic ram ensures just enough material is injected into the mould each time
- the mould is then cooled so that the moulded plastic can be removed
| Application | Features of injection moulding |
|---|---|
| Consumer products (toys, kitchenware) | Allows for high volume production with complex shapes and fine details. |
| Car parts (dashboards, clips) | Produces lightweight, durable components with precise dimensions. |
| Medical devices (syringes) | Ensures high standards of cleanliness and accuracy in production. |
| Packaging (bottles, containers) | Creates containers with excellent barrier properties and custom designs. |
| Electronics (housing for components) | Enables intricate designs for electronic components while maintaining strength. |
Casting
Complex metal shapes can be cast by melting metal and then pouring it into a mould. It is possible to cast A soft alloy of tin and copper. quite easily. The melting point is low, around 200°C, and moulds can be made from laser-cut or hand-shaped medium-density fibreboard (MDF).
A process of making a mould in sand so that a molten metal can be poured to take a form. can be used to cast larger and more complex shapes as it uses a two-part mould:
- a A solid shape that is often used to make a mould. is made, usually by hand, and is placed in the Sand used for sand casting - it is not green in colour but is used in a wet state so stays in position in the casting box., which is packed tightly around the former before it is removed
- this is repeated on the other part of the mould
- two holes are made in the sand, one for the molten metal to be poured into (the runner) and one for the metal to come up and out the other side (the riser)
- once they are both ready, parting powder is applied to the sand and the two moulds are placed together, one on top of the other
- the molten metal, often aluminium in schools, is poured into the runner until it comes up to the riser when the cavity in the sand is full of metal
Sand is compressed around a former to create one half of a mould and around a runner and riser for the other. These are joined and molten metal is added.
| Applications | Features of casting |
|---|---|
| Metal parts (engine blocks, gears) | Produces complex shapes in a single step with high strength. |
| Jewellery (rings, bracelets) | Allows for intricate designs and fine detailing in metals. |
| Sculptures (statues, art pieces) | Suitable for large, detailed and unique shapes. |
| Industrial components (valves, pump housings) | Can produce durable parts that withstand high pressure and wear. |
| Dental and medical implants (crowns, prosthetics) | Allows for custom shapes and precise dimensions for medical use. |
Extrusion
Extrusion works in a very similar way to injection moulding:
- granular plastic is held in a hopper
- it is moved by Archimedean screw along a heated tube, called the heating chamber
- once the polymer has been melted it is pushed through a A die is used to cut or shape materials by forcing them through the mould, which will form the shape of the extrusion
- because there is no hydraulic ram in this process, molten plastic can be fed through the die continuously
Common extruded polymer products are plastic pipes, tubes and guttering.
| Application | Features of extrusion |
|---|---|
| Pipes and tubing (PVC, rubber) | Produces long continuous shapes with uniform cross sections. |
| Window frames (plastic, aluminium) | Allows for complex profiles, strong and lightweight materials. |
| Plastic films and sheets (packaging) | Creates thin, flexible layers that can be produced in large rolls. |
| Wires and cables (electrical insulation) | Encases wires with protective coatings, ensuring uniform thickness. |
| Profiles (trim, decorative mouldings) | Ideal for producing consistent and precise shapes in high volumes. |
Deforming
Deforming techniques are manufacturing processes that change the shape of materials by applying pressure, heat, or a combination of both. Unlike reforming, which often uses molten material, deforming techniques work on materials in a more solid but softened state. These methods alter the material's form without removing any of its mass.
Examples include blow moulding, laminating, and press moulding, where materials are stretched, compressed, or bonded to achieve the desired shape.
These techniques are used to create a wide range of products, from hollow containers to layered materials with enhanced properties.
Blow moulding
Blow moulding is used to shape plastics, eg bottles, plastic barrels and similar shapes.
A tube of softened plastic called a Check your connection, refresh the page and try again. is Shaped by being forced through an opening. into a mould.
- parison is inserted into a mould
- the base of the parison is squeezed by the mould
- air is blown into the parison, which expands to fill the mould
- the finished product is cooled and released from the mould

| Application | Features of blow moulding |
|---|---|
| Bottles (water, milk, shampoo) | Produces lightweight, hollow shapes with uniform wall thickness. |
| Containers (detergent, food storage) | Can create complex shapes with handles and threads for lids. |
| Plastic fuel tanks | Ensures durability and resistance to chemicals, suitable for large items. |
| Toys (plastic balls, figures) | Creates strong, hollow structures with flexible designs. |
| Packaging (cosmetic packaging) | Efficient for high volume production with consistent quality. |
Laminating
Laminating is the process of bonding multiple layers of materials together using adhesive, heat or pressure. It enhances strength, durability and appearance.
Laminating thin, flexible layers of wood to form a stiff, usable shape.
This process is used to make different products in a wide range of sizes.
For this example, we're making a small arm rest for a chair, but for larger items you'll need to take a slightly different approach.
Before we get started, you will need:
Your mould
Three pieces of flexible wood
Some PVA glue and brush
Some paper and some G-clamps
You should have your mould ready - so go and grab that if you haven't already got it.
To get started cut three pieces of 3mm thick wood. Plywood or aeroply will give you the best results, but you can also soak or steam your wood to make it more flexible if needed.
When stacked together, these will give you a finished product 9mm thick.
Remember, the more layers, the more rigid the shape will be, so have a think about how much give you want in your end product.
PVA glue should now be applied in a thin layer to each surface that will be in contact with another surface, keeping the layer of glue thin enough so that the grain of the wood is still visible.
You can use a brush, a spreader, or even a scrap piece of wood for this. In this example, you will need to apply the glue to both sides of piece two.
Stack the layers like a sandwich with piece two in the middle.
It's a good idea to place some paper or card between the mould and the outer laminates to prevent the component sticking to the mould.
If you do this, you can re-use the mould.
Now you're ready to clamp the two halves of the mould around the wood using G-clamps. Trigger clamps can help to hold it in place while you secure it.
Then leave it to dry.
Once it's dry, you can remove the laminated wood from your mould.
Now you'll need to cut, sand and finish so check out 'Explain this… How to finish wood' in this series for a step-by-step guide.
| Application | Features of laminating |
|---|---|
| Furniture (laminated wood, countertops) | Increases durability, scratch resistance and provides an aesthetic surface. |
| Packaging (food wrappers, pouches) | Enhances barrier properties against air, moisture and light. |
| Car interiors (dashboard, trims) | Adds strength, heat resistance and improves appearance. |
Press/compression moulding
Press moulding is used to make electrical fittings, handles, and many other products but can only be used with thermosetting plastics. A mould is made in two halves and sheet plastic is placed between them. They are then heated and pressure applied, forcing the plastics to assume the new shape.

| Application | Features of press/compression moulding |
|---|---|
| Electrical components (switches, sockets) | Produces strong, heat resistant parts with precise shapes. |
| Car parts (bumpers) | Suitable for large, durable, high strength components. |
| Household goods (kitchenware, handles) | Can mould thick, rigid parts with excellent surface finish. |
| Airplane parts (insulation panels) | Creates lightweight, high performance components with complex shapes. |
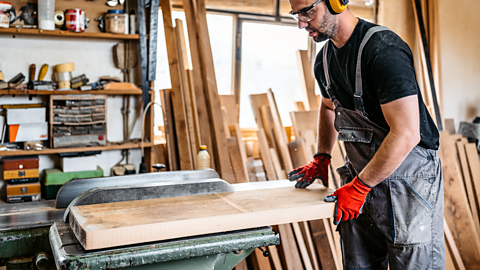
Manufacturing tools
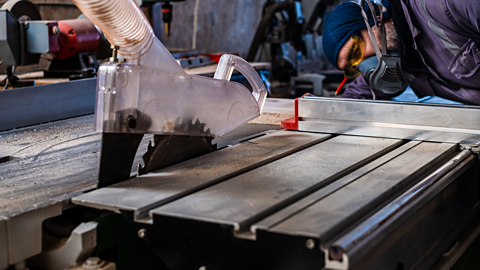
Circular saw
A large machine used only by trained staff. It has a toothed circular blade that rotates to cut through materials.
Used for making straight cuts in materials like wood and plywood. The circular saw can also be adjusted for depth to cut through various thicknesses.
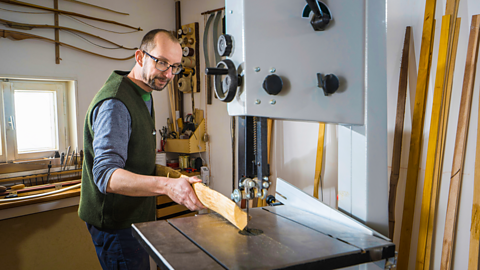
Band Saw
A machine used only by trained staff. A saw that uses a long, continuous blade that moves on two wheels to cut materials.
Ideal for making intricate cuts and curves. The band saw is particularly useful for making precise cuts.
How to use a bandsaw, safely
A bandsaw is a power saw with a long, sharp blade. This is a continuous band of toothed metal that moves up and down at a very high speed, allowing you to cut through a range of materials.
Your first step as always should be to choose the correct PPE.
Safety glasses will protect your eyes from any dust or debris.
Ear protection can protect your ears from the noise of the machine.
Lastly, ensure your hair is tied back if necessary and any loose clothing is secured. An apron can also add another layer of protection and help protect your clothes from dust.
Your first step should be to familiarise yourself with the bandsaw.
Know where your on/off switches are located. Including the closest emergency stop button and the footstop button on the machine.
Knowing which direction the blade cuts in is the most important thing to be aware of.
A guide can also be lined up to ensure a precise cut.
When you are ready to begin cutting, start by turning on the machine.
Place your work on the table, lining up the section you would like to cut with the saw blade. This is where a guide can be very useful.
Then simply begin to slowly feed your material towards the blade.
To ensure your hands don't get too close to the saw blade, you can use something to push the material along the table. This should also give you more control over the cut.
Depending on the size/shape of material you are using and the cut you would like to make you can also use another type of guide (not sure of the name for this). This will give you a flat surface for your material to sit against as it's being fed into the bandsaw.This should help with making a cut in a straight line.
A bandsaw doesn't always need to cut in a straight line. You can also use it to cut a curved line.
Make sure you have the shape marked out clearly on the material beforehand. This will allow you to use it as a guide.
Feed the material into the bandsaw, slowly turning the material as required to follow along the marked out path.
Cut close to the line but not directly on it. This will ensure you don't make a mistake. You can then clean up the edge after the cut.
Once you are finished cutting, make sure to turn off the machine.

Jigsaw
A handheld power tool with a straight, reciprocating blade for cutting various materials.
Versatile for making curved, detailed and intricate cuts in wood, metal and plastic. Jigsaws can cut shapes and patterns with accuracy. The blade can be changed easily to suit different materials.
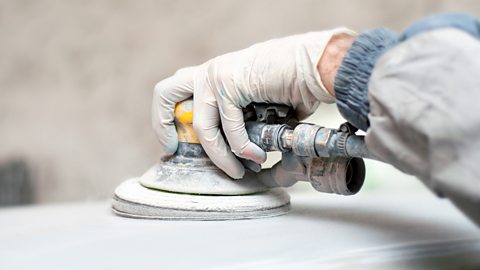
Sander
A handheld tool that smooths surfaces using abrasive materials such as sandpaper.
Used to finish the surface of wood making it smooth to the touch and ready for painting or staining. Sanding is essential for achieving a professional finish in woodworking projects.
Linisher
A workshop machine that uses a continuous loop of sandpaper (the belt) to smooth surfaces
Commonly used for sanding projects to the desired size. The linisher is effective for removing material quickly and efficiently, making it ideal for heavy duty sanding tasks. It can also be used to shape wood and remove old finishes.
Planer
A large machine that is only to be used by trained staff. A planer trims wood to a uniform thickness and creates smooth, flat surfaces.
Used to flatten and reduce the thickness of wood, making it ideal for furniture making and cabinetry. The planer removes imperfections and ensures a smooth finish, allowing pieces to fit together properly in construction. It can be adjusted for different thicknesses to suit various projects.
The machines used in computer aided design & manufacture (CAD/CAM)
In modern production, designers and manufacturers use specialist equipment, known as computer aided manufacture (CAM) machines. These machines are controlled through a computer, and are used in high-volume production.
Examples of CAM machines are:
Laser cutter
A laser is directed from a precise length on to a material to either cut or etch. The laser is controlled from a computer using acomputer aided design (CAD) drawing. Manufacturing can be restricted because of material choice and thickness.Computer numerical controlled (CNC) miller
Similar to a pillar drill, a milling machine uses a rotating cutting tool. This tool is able to move along multiple axes to create a range of shapes and designs. This movement is controlled through a computer using a CAD drawing.3D printing
An A method of shaping a form by building on top of material. computer aided manufacture (CAM) process that follows CAD designs to place layers on top of each other repeatedly and create a 3D object. A A material in a thread-like form. of plastic is fed into the machine and heated so that it is softened and sticks to the previous layer. It has been used in many industries, including in the production of prosthetics, but can be used in electronics also.
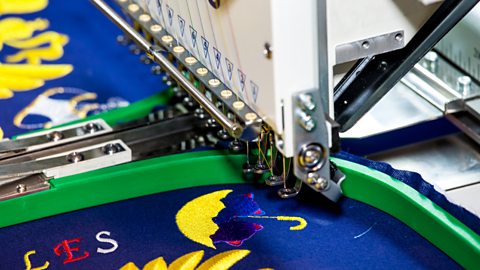
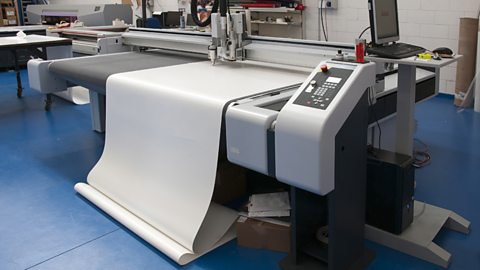
Other types of CAM include CNC embroidery and vinyl cutting.
| Advantages of CAM | Disadvantages of CAM |
|---|---|
| Fast | High initial cost |
| Accurate | Maintenance of machines is required |
| Can be repeated easily | Workers need training |
| Less labour-intensive | Less workforce is needed |
| Fewer errors |
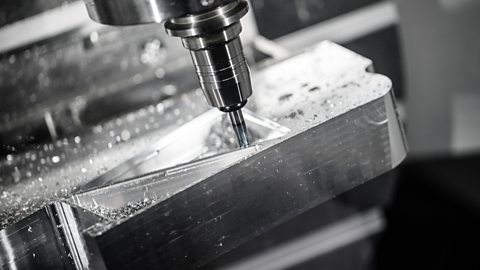
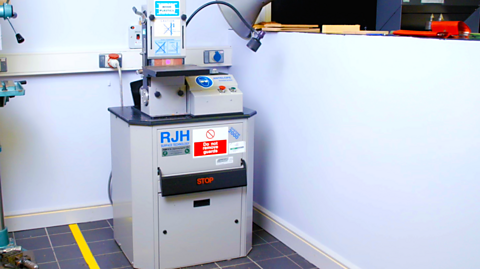
Image caption, CNC milling can cut wood and plastic as well as metal


1 of 5
Test yourself
More on Manufacturing practices
Find out more by working through a topic
- count3 of 7