Selecting tools and processes
Each aspect of designing and making features An expert person or tool. tools, which are being developed and improved all the time. Selecting the right tools and equipment for a job is vital when producing a quality product.
Important tips for selecting the most appropriate tools and equipment:
- use Internet research and watch online instruction videos
- access forums and blogs to read public tips on successful production
- ask other people and visit or email specialist workplaces
- visit the local library and research techniques in specialist books
- companies who manufacture the tools and equipment often have detailed instructions online for their use
Material selection
A range of different materials could be used when producing a product, such as:
Materials need to be chosen according to the The mechanical, physical or optical properties of materials that define how they behave in use. that will make them suitable for the required uses of the product. Different materials will require different:
- manufacturing processes (including hand tools and machinery)
- techniques
- components
- fixtures
- finishes
- maintenance
Designers are required to think not only about the design and manufacture, but also the use and then the consequent environmental impact of the product when it comes to the end of its life.
Surface finishes
Surface finishes can be Practical and useful. or How something looks.:
- functional finishes - can help protect or insulate material, stop A gradual destruction of metal due to a chemical reaction that leaves an oxide on the surface. and decay, avoid Ultraviolet light is a form of radiation that can come from the Sun, or is artificially produced by ultraviolet lamps and bulbs. light degradation, stop biological attack from insects or fungus, improve hygiene and can be antibacterial
- aesthetic finishes - can add decoration or colour and are smooth or textured
Marking out
Accuracy is vital to a quality finished product. The UK recommends the use of metric measurements using millimetres (mm), centimetres (cm) and metres (m).
Datum references
When Marks made on an item before cutting or forming. an object, A point marked on an object that all measurements are taken from. are used as a reference point for all measurements to be taken from and can be chosen by the manufacturer. By taking measurements from a small number of set points, accuracy can be improved and maintained.
A datum reference can be along the straight edge of a design, known as datum surface, or a single datum point, often found in the corner of a design. In a circular shape, it would be around the edge or from the centre.
In this example, the opposite corners of the shape are connected with Lightly drawn lines that aid the accurate placement of permanent lines in a diagram. and the intersection creates a reference point in the centre of the work. This is one example of a datum point.
Datum references are particularly useful for aligning The manufacture of a part or product from a computer aided design (CAD) using computer-controlled machinery, such as a 3D printer. machines, which use the point where the X- and Y-axis meet as a datum reference. They can also be used to A graduated range of values to make something proportionally bigger or smaller. sizes up and down in measurements by using the X- and Y-axis.
A tool used to aid the repetition of a process and/or to hold a work in place. are tools made specially to help place a material in the same place repeatedly. They are particularly useful for marking out where holes need to be drilled or joints cut. They cut production costs by saving waste, speeding up the process and improving accuracy. Templates and patterns can be used to ensure that exactly the same shape it being repeated.
Marking-out tools
A range of marking-out tools can be used to show where to cut, drill and assemble parts. Simple marking out can be done with a pencil, but more accurate and consistent markings can be done with:
- tape measure - to measure straight and curved shapes
- pins - to hold pattern pieces in place and mark points on fabric
- craft knife - to cut and score (mark), particularly used on paper and card
- compass - to mark out circles
- A sharp object used to scratch a line. - a sharp point to put a fine scratch on the surface of the metal that is being marked
- mitre square - to measure 45 degree and 135 degree angles for mitre joints in picture frames
- mortise gauge - to mark out lines parallel to an edge
- A sharp object used for making a dent, so a drill bit can find a centre point in preparation for drilling. - to create a drill point before a hole is drilled so that the drill bit does not slip on the surface
- A tool used to make 90 degrees. or try square - to mark out at 90 degrees to an edge or face
- marking knife - to score lines
- sliding bevel - can be adjusted to mark a specific angle
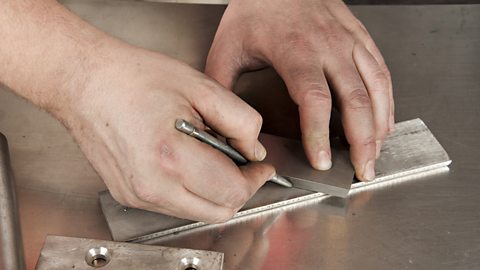
Image caption, Scriber


1 of 6
