Hands-on science: The Magic of Science

The Magic of Science

Is it the science of magic? Or the magic of science?
Join Dallas Campbell as he pulls a few tricks out of the bag for a truly Bang-style magic show. Read below to find out why and how it all works.
Download the Magic of Science PDF(595 Kb). Adobe Acrobat is required.
Step by step
Dallas's video guide
In order to see this content you need to have both Javascript enabled and Flash installed. Visit BBC Webwise for full instructions
Magic man, Dallas Campbell, pulls a few tricks out of the bag in the name of science.
Checklist
| Difficulty: low | Have a thorough read of the instructions below. |
| Time/effort: Medium | There's a few things to prepare first - but then it's as easy as magic. |
| Hazard level: medium | Stoves, skewers, bursting balloons...adults should be on hand for this show. |

SAFETY: Children may need an adult to help them use the stove and to ensure correct eye wear is worn during the can crusher trick.
Can Crusher
You need:
Gas/electric stove
Empty drinks can
Protective eye-wear
Tongs
Pan/plate
Water
What you do
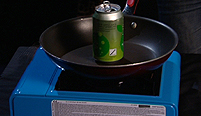
If using a gas stove, place the can on a frying pan.
Light a gas or electric stove. If gas, place a fry pan on top.
Take an empty drinks can (carefully pull the cap off) and pour a little bit of water inside.
Place the can either on the frying pan or straight on the electric hob.
While it heats up, pour some cold water into a shallow bowl/tray.
Get your eye goggles and tongs ready.
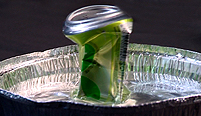
Once there's a significant amount of steam coming out of the can, use the tongs to pick the can up and quickly turn it over (so the opening is facing the bottom) into the tray of water.
What should happen
It might not be fast, but it's a fun way to crush a can!
Your drinks can should make a great popping sound while the can instantly crushes.
If it doesn't work for you
If your can doesn't crush at all then you probably didn't get the water inside hot enough. Try it again and this time leave it a little longer until you can really see the steam coming out of the top.
Levitating Ice
You need:
Cubes of ice
Piece of cotton thread
Salt
Water
Plate
What you do
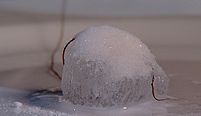
Ice cube topped with cotton thread and salt.
Place a cube of ice on a plate.
Wet the end of a piece of cotton.
Wrap the wet end of the cotton around the ice.
Pour salt onto the ice until the end of string is completely covered.
Leave for roughly one minute.
Lift up the dry end of the thread.
What should happen
The ice should attach to the cotton and lift up with it.
If it doesn't work for you
If your ice doesn't lift then you either need more salt or to leave it for a bit longer.
Psychedelic Milk
You need:
Full-fat milk
Food dye (at least two colours)
Liquid soap (for hands or dishes)
One deep plate or tray
What you do
Pour some milk onto your plate/tray.
Add the food colouring.
Pour a big drop of soap into the middle of the plate.
What should happen
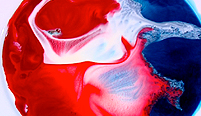
A milky lava-lamp.
The food colouring should instantly move away from the soap in a continuous fashion causing colourful swirls and to quote Dallas "your own home-made lava lamp.''
If it doesn't work for you
It's important that you only use full fat milk. For reasons explained below, skimmed or semi-skimmed will not work. Also, we found that water-based food colouring works best, so avoid buying any with glycerol.
Static Balloon
You need:
A bowl and spoon
Cornflour
Oil (we used sunflower oil)
One balloon
What you do
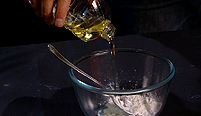
Oil and cornflour makes slime.
Pour two tablespoons of cornflour into a bowl.
Add a tablespoon of oil and mix it until it has a honey-like consistency.
Blow up a balloon.
Rub the balloon against your hair or on a woollen jumper.
Take a clump of the cornflour/oil mix on a spoon and holding it up near the balloon.
What should happen
An overwhelming attraction.
The cornflour mix will be so attracted to the static balloon that it will actually bend off the spoon in the direction of the balloon.
If it doesn't work for you
If the cornflour doesn't bend then your balloon might not be static enough. Try another source on which to rub the balloon. Wool works wonders.
Balloon Kebab
You need:
A balloon
A wooden skewer
Oil (we used sunflower oil)
What you do
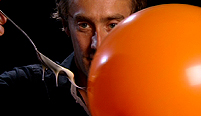
It's magic- or bust.
Blow up your balloon but don't tie it. Let the balloon deflate.
Now, blow the balloon up again and tie it.
Take a wooden skewer and dip one end into some oil.
Pick up the balloon so that the tied end is near you.
Find the part of that end that is darkest (where the balloon has been stretched the least) and carefully poke the oiled end of the skewer through it.
Gently keep pushing the skewer through, twisting it if need be.
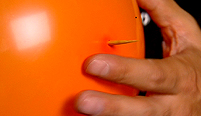
Now the skewer needs to come out of the other end of the balloon.
Aim for the little bump present on the bottom of the balloon. Again this should be darker than the area around it, because it is the least stretched part of the balloon.
Twist the skewer through this part of the balloon and pull it all the way out.
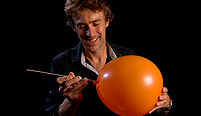
What should happen
One balloon kebab coming right up.
The balloon should not pop when poked not once, but twice, with the skewers.
If it doesn't work for you
It all depends on which part of the balloon you poke the skewer through. You should only aim for darker areas of the balloon, as this is where the balloon is stretched the least hence it is thicker and tougher than the rest.
What's going on?
Can crushing science
When the can is heated the water in the bottom boils and turns into water vapour. Water vapour has a bigger volume than liquid water so it pushes all the air out of the can. When the upside down can is placed in the cold water it rapidly cools and the water vapour turns back into liquid form. Liquid water takes up much less space than vapour and so a partial vacuum is created inside the can. Because the can is submerged in water, when the water vapour condenses, air can not rush into the can to equalise the pressure. So the can implodes because the air pressure on the outside is greater than the air pressure on the inside.
For more air pressure science tricks, Watch Dr Yan sucking an egg into a bottle.
Levitating Ice
At the surface of the ice cube because it is in contact with warm air there are always some molecules of water melting. When you add the salt it dissolves in the surface water and the resulting salt solution has a lower melting temperature than the pure water . However, in our experiment as more ice melts the salt solution becomes more diluted and eventually it reaches a point where the melting temperature is no longer so far below zero and because the temperature of the bulk ice is below zero the solution solidifies again around the string and so it can be lifted up.
Salt and ice make incredible science-magic tricks. Check out Dr Yan using salt to turn water into ice with a single bang.
Psychedelic Milk

Water molecules bond to one another creating a tight surface, known as surface tension.
The colours whizz away from the soap due to the reduction in surface tension. Since milk is mostly water, it has surface tension like water. This means the positive end of one water molecule is attracted to the negative end of another molecule and so on, which creates a tense surface (see diagram). The food dye, when poured in, sits on top. The milk is more dense than the dye (it has lots of fats and proteins in it) so the dye doesn't change anything. However, when you introduce soap to the milk, the soap molecules (surfactants) break the bonds between the water molecules. This lowers and surface tension so the dye is free to flow throughout the milk. Think of it as stretching a rubber band (so it is very tense). You can imagine what would happen to the band if you took a pair of scissors and cut it in the middle. That is like what is happening to our food dye when the surface tension is broken with the soap.
A soapy mess
So how does the soap break the surface tension, you ask. Well, the surfactants in the soap have polar heads that are water loving (hydrophilic) and tails that are repelled by water (hydrophobic). When the soap is added to the milk these surfactant molecules arrange with the hydrophilic heads in the milk (where the water is) and the hydrophobic tails in the air. The surfactants spread out on the top of the surface, interrupting the surface tension, which causes the colour to whizz away from where the soap is added.
Blue is Top
Why full-fat milk? Below the surface there are more surfactant molecules which form into structures called micelles. These micelles interact with the fat globules in the milk (hence blue top) which enter into the centre of the micelles. There is movement of the surfactant molecules through the milk which results in the currents that can be seen by adding the food colouring.
Electric Balloon
Materials are made up of atoms and molecules that contain positively charged protons and negatively charged electrons. When there are equal numbers of each in an object there is neutral charge on the object. But when the balloon is rubbed against your hair/jumper electrons move from the jumper to the balloon. So the balloon becomes more negatively charged. The negative charge builds up on the surface of the balloon and this charge is static electricity.
There are also lots of negative and positive charges in the cornflour, evenly distributed in each particle, resulting in it being neutrally charged. When the balloon is brought near to the cornflour the negative charges within each starch particle are repelled by the negatively charged balloon. But the positive charges are attracted. So each particle has one side that is attracted and one that is repulsed. They line up so that the positive sides are nearest the balloon and this combined attraction is strong enough to allow the whole stream of cornflour-oil mix to move towards the balloon. Adding oil gives the slime the perfect consistency for the experiment to work.
Balloon Kebab
Balloons are made of rubber/latex, which is made up of long polymer chains which form cross links with each other. The chains can stretch up to a point and the cross links between chains allow them to return to their original formation – the balloons are made up of an elastomer. Where the inflated balloon is at its widest the rubber is under the most tension. Piercing causes the tension in the rubber to pull on the hole making the balloon burst. The polymer strands are stretched more tightly here and the cross links are more likely to break.
But at either end of the balloon is an area where the rubber is not as stretched and under less tension. Here there is a greater concentration of polymer chains forming cross links. The skewer can pass through the rubber making a hole and pushing the surrounding polymer chains aside. The polymer chains have enough elasticity to stretch around the skewer. The oil helps to seal the hole. Removing the skewer will allow the air to escape slowly though the hole.
BBC iD
BBC iDBBC navigation
BBC links
BBC © 2014The BBC is not responsible for the content of external sites. Read more.
This page is best viewed in an up-to-date web browser with style sheets (CSS) enabled. While you will be able to view the content of this page in your current browser, you will not be able to get the full visual experience. Please consider upgrading your browser software or enabling style sheets (CSS) if you are able to do so.
