Hands-on science: Super Cool

Super Cool

Can you make water turn to ice with a single splash or a bang?
Dr Yan demonstrates just how super cool science can be.
Step by step
Yan's video guide
In order to see this content you need to have both Javascript enabled and Flash installed. Visit BBC Webwise for full instructions
Dr Yan demonstrates how to turn water into ice - with a bang!
Checklist
| Difficulty: low | Come equipped with a good supply of ice and salt |
| Time/effort: medium | It might take up to an hour - but be patient, it's worth it! |
| Hazard level: low | Just don't keep your fingers in the bucket too long - it's super cold |
You need
1 bucket (a metal one is great if you have it)
Ice! At least 1 bag full
Thermometer (helpful but not essential)
Salt (750g tub)
500ml plastic bottles of mineral water (minimum 3 bottles)
What you do
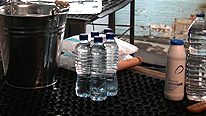
The ingredients to super cool.
Take three to six (sealed) plastic bottles of mineral water.
Place them all in your bucket.
Pour in a bag of ice. Add some tap water so it's really slushy.
The lids of the bottles should be sticking out the top of the ice/water mixture so they are easy to handle without freezing your fingers.
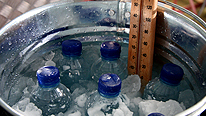
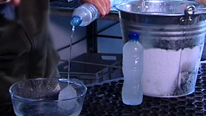
Fill the bucket with ice, water and salt.
Make it salty! Pour a lot of salt into the bucket. We recommend half a 750g tub for three bottles and the whole lot if, like Dr Yan, you use six bottles (though this is not essential).
Move the bottles around so they are evenly placed amongst the ice, salt and water.
If you have a thermometer place it gently into the bucket (position it so it doesn't fall in. Icy water might be fine for polar bears but trust us, it's cold on the human arm!)
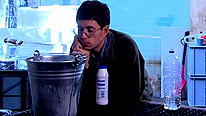
Dr Yan keeps his eye on the prize.
Find something to amuse yourself for a good 30-45 mins. Don't stray too far away as you need to come back every so often to check the temperature and turn the bottles (gently!) so that they super cool evenly.
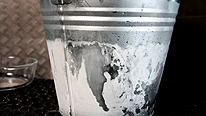
Check for ice on the bucket.
Time up! If your thermometer reads anything from -6 to -8 degrees (celcius) then it's probably good to go. The other indication that it's ready is a layer of ice on the outside of the bucket (if using a metal bucket).
Gently remove one of the bottles.
Has it frozen? If so put it down (outside the bucket) and very carefully try another bottle.
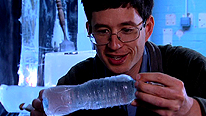
Dr Yan holds a bottle of super cooled water.
Choose the method of freezing that really floats your boat. If you like to get some bang for your buck then follow these instructions:
Turn the bottle on its side. Swing it lightly back and then BANG it against a wall.
If you prefer the frozen fountain approach, then try this: take a glass bowl and place a few ice cubes inside. Gently open the lid of your super cooled bottle of water. Slowly pour it onto the ice in the bowl.
What should happen

Bang! An ice is born.
The bottle you banged against the wall should rapidly become one large ice block. You should be able to see the colour change as ice spreads down the bottle. You should be overwhelmingly impressed and find yourself calling others to gather and watch while you repeat the magic with another bottle.
Pouring solid ice?
If you tried the pouring trick, then the liquid water should turn to ice as soon as it makes contact with ice cubes in the bowl. This means that you should be able to produce a tower of ice as you keep pouring. This method should delight all who view it, causing sharp intakes of breath and a mesmerised 'ooooh' from all in the room.
If it doesn't work for you
If your bottles of mineral water froze while in the bucket then it could mean you left them for too long. Or perhaps the bucket was knocked or bumped while cooling. Movement (as you see with the bang) can cause instant freezing. This is why the bottles must be handled carefully.
The mineral water might also have frozen too early because there were some impurities in the bottles eg scratches on the inside of the plastic. This is out of your control and cannot be helped. Once the bottles have frozen you cannot use them to be super cooled. So, turn them into ice slushys to have in the sun and start over with new bottles.
If your liquid water doesn't turn to ice when you bang it, it probably means your bottles haven't super cooled. Remember super cooling is when the water is taken to below zero and stopped from freezing. So if you took the bottles out of the bucket too early, and the temperature wasn't at least -6, then they probably didn't super cool.
If the water didn't get cold enough then it probably means you didn't use enough ice or salt.
Tip: You can do this experiment without using the bucket and ice and salt. In fact you can do it using something sitting in your kitchen: the freezer! Just pop the bottles in and keep checking on them. This seems easy but deciphering how cold a bottle is in a freezer is much more difficult. Try leaving it there for 30 minutes and then check on it. If it's still in liquid form, give it a bang!
What's going on?
What's so super about cooling?
There are three important parts to this experiment:
1) Gradually cooling the bottle to below freezing.
2) Stopping the bottled water from freezing.
3) On-demand freezing.
1) Take it with a grain of salt
Dr Yan cooled the bottles by floating them in a bucket of ice, salt, and water. Salt lowers the freezing point of water, so the salt basically makes the ice melt (this is why salt-grit is added to the roads when there is snow). Crucially, as the salt melts the ice, it actually lowers the temperature of the whole mixture, so the salty slushy mix in the bucket can get as cold as -10 degrees, gradually cooling the bottled water at the same time.
2) As pure as the driven snow
The water in the bottles doesn’t have any salt in it. Yet even when it gets below zero degrees, it’s possible to stop it from freezing. What’s important is that the water and its environment is quite pure,with no irregularities. We achieved this by using mineral water (which is filtered before bottling): normal tap water has too many particles in it. Also, the plastic bottle is nice and smooth on the inside. Why is this all so important, you ask?
Well, for water to become ice, the molecules must line up in a regular array as they form crystalline ice. A bit like soldiers on parade. However, it is quite a challenge to make the first ice crystal form. In fact, doing so requires some sort of starting point or a grid to line the molecules up properly. This starting point is called a 'nucleation site' and it often comes in the form of an impurity. These can be anything from rough edges on a container, dust, or tiny ice particles such as those which fall into the ice tray in your freezer. It is anything that the water molecules can use to freeze on. Without these impurities, the temperature can drop lower than zero and the water will remain in liquid form.
3) The big bang
So, now we have bottles of super cooled water just waiting around for something to trigger freezing. Was the banging of a bottle this trigger? After all, nothing was added to the bottle. Nothing that we could see anyway. One theory is that the banging creates microscopic air bubbles near the surface in the bottles and these bubbles act as the impurity/nucleation site.
Pouring ice
Yan's extra trick - pouring liquid water that lands as solid ice - worked because of the ice cubes already in the bowl. One of the best nucleation sites that you can use to form ice crystals, is other ice crystals. Think of the ice crystals now as school children who are too busy talking to get into line during assembly. An angry teacher comes out and hushes until they go quiet. Once one child gets the message - and gets into line- it should start to work on the rest. (This is not to imply that angry teachers are like molecular impurities!)
Swot fact
Using salt to lower the freezing point of the mixture was a vital element in the traditional methods for making ice cream. In fact, many domestic ice-cream makers still use a solution of pre-frozen salt and water, which gradually melts while the ice cream freezes.
BBC iD
BBC iDBBC navigation
BBC links
BBC © 2014The BBC is not responsible for the content of external sites. Read more.
This page is best viewed in an up-to-date web browser with style sheets (CSS) enabled. While you will be able to view the content of this page in your current browser, you will not be able to get the full visual experience. Please consider upgrading your browser software or enabling style sheets (CSS) if you are able to do so.
