Drape forming is ideal for creating curved or more complex shapes out of plastic.
Before we get started here's what you'll need:
Acrylic or a similar thermoplastic
Access to an oven or hot air gun
Your mould
And some leather hot work gloves, an apron and goggles
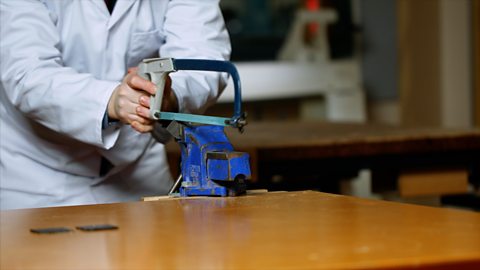
The first step is to make your mould out of MDF or softwood.
The surface should be sanded smooth so that it doesn't leave any marks on the plastic.
You'll need to wear your hot work gloves for this so get them on now if you haven't already.
There are two options to heat the acrylic.
If you only need to heat a section you should use a hot air gun. Hold the gun over the area moving it slowly backwards and forwards to heat the whole area evenly. Keep doing this until the plastic is soft.
If you want to heat the entire sheet of plastic, then you can put it in to the oven at 160 degrees, until the sheet is completely softened. Now, turn off your heat source, take your softened plastic sheet and drape it over your mould.
Hold the plastic in position until it's cooled and hardened.
Then you can remove the hardened plastic and finish it for your final product.
Check out the 'Explain this… Finishing Plastic' video for more detail.
Video summary
This short film explains the process of drape forming, which is used to create curved or more complex shapes out of plastic.
Clear acrylic is used in this example but the processes can be used with a wide variety of thermoplastics for RMT, engineering and graphics projects.
Teacher Notes
Points for discussion
- What are the key differences between line bending and drape forming?
- How might you create more complex, compound shapes using vacuum forming?
- What are the key aspects of mould design and preparation?
- How good is this process in terms of repeatability and for use as a batch production process?
- What kinds of commercial products or components are made using this process?
- How you might scale up or mechanise the process for larger scale production?
- What is the thermoplastic cycle and how can plastics be recycled?
Suggested activities
- Make some clear plastic covers for curved boxes or enclosures.
- Study acrylic furniture and then design and make your own prototype piece.
- Create a wind ornament for a garden.
- Combine this technique with line bending to make a mobile phone holder or desk tidy.
- Make a designer set of goggles or a prototype pair of smart glasses.
- Create a lampshade for an LED lighting project.
- For KS4, this process can be used in a wide variety of product design and graphic product solutions.
Suitable for teaching design and technology (D&T) at KS3/KS4 in England, Wales and Northern Ireland, and 3rd/4th levels in Scotland.
Line bending. video
This short film explains the process of line bending, which is a technique used to make precise folds in plastic components.
Marking shapes on metal. video
This short film explains how to mark out a design on metal before you begin cutting.
Cutting a shape from metal. video
This short film explains the different ways to cut metal, depending on your design.