Doctor Who Mission Sonic: Code with Python!

Bring Sound to your Sonic Gadget!
So you've made your own Sonic Screwdriver (Or at least, some kind of Sonic Gadget). Nice! But it's not going to do anything on its own - let's get coding and bring it to life!

You've chosen to use the Python code editor to complete this part of the mission, solid. With Python, coding is entirely text-based. That sounds a little scary, but don't worry! It's easy to get started.
Our goal is to have our Sonic Gadget do the following:
- We want to activate our gadget when the A button is pressed
- When the A button is pressed, we want a sound to play!
Oh but don’t forget – the micro:bit can’t play sound on its own – you need to add some speakers or headphones first!
Don’t worry though, you can find a simple guide on how to hack your headphones here.
With Python, before we start with our code, we have to state what special functions we intend to use. The micro:bit has a bunch of modules, from Random to Radio, but today, we're going to need these:
from microbit import*
import music
Everything we want the micro:bit to do when it's powered on is listed inside a 'While True' statement. This will create a loop that runs continuously as long as the micro:bit is powered on.
Be careful! Python (and many other programming languages) use 'indenting' to keep its instructions all in order. Any instructions you want to run inside the While loop will need to be indented. You can indent using the space bar, or by using the 'Tab' key (it's right above the Caps Lock key)
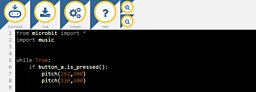
We want our micro:bit to keep checking if the A button has been pressed in this loop so we will use a conditional statement. “if button_a.is_pressed():”. The instructions that should be executed in an if statement must also be indented (so you'll be indenting the next commands twice. Make sense?).
If button A is pressed then we want our BBC micro:bit to play a sound effect. To achieve this, we can use the pitch function. This function takes two parameters, typed inside (brackets). The first parameter is frequency. This creates the tone. The second is duration in milliseconds. You probably know already by there are 1000 milliseconds in a second.
It can be tricky to choose the correct frequency for the pitch when it's just a number, but there are a few different conversions charts on the internet you can use. From there, experiment with pitch and duration until you find something that sounds good to you.
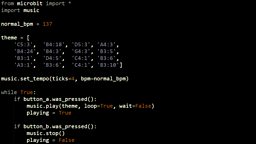
The image above shows how we chose to write the code. If you'd like to experiment with an already made version, you can download the script here by right-clicking and choosing ‘Save as’.
Bonus: Play the Doctor Who Theme!
If you feel like taking things one step further, why not have your Sonic Gadget play the Doctor Who theme! We've made a .hex file that creates music by writing individual notes in a list. It might look confusing when written down, but when you run it in a script...
theme = ['C5:3', 'B4:18', 'D5:3', 'A4:3',
'B4:24', 'B4:3', 'G4:3', 'B3:5',
'B3:1', 'D4:5', 'C4:1', 'B3:6',
'A3:1', 'B3:6', 'C4:1', 'B3:10']
Download the Doctor Who Theme .hex file by right-clicking here and choosing 'Save as', then see what you can make with it.
Make your Sonic Gadgets respond to movement!
Well done on getting your sonic gadgets working! You're almost ready to start taking on the Dalek menace properly, but the Doctor’s sent one last coding task for you.

My database says the Sonic Screwdriver has countless different settings. It can do anything from open locked doors to blocking trolls on Snapchat; all by using the right sonic frequency. Your Sonic Gadgets are definitely noisy, but I’ll show you how to manipulate that music, mostly through movement!
We’re going to modify our Sonic Gadget to do the following:
- The micro:bit will play two tones when the A button is pressed, like before.
- When you tilt the micro:bit left and right, the pitch of the tones shift up and down.
To get this working, we'll need the accelerometer block from the Input tab. The accelerometer is a sensor built into the micro:bit and can detect movement in 3 directions called X, Y and Z. Don't worry about having to start over with a new script, we can use the one we made earlier.
To have the micro:bit respond to being tilted, we need to use the ‘accelerometer.get’ command. This will check where the micro:bit is positioned and give it a value. We can then store that value as a variable. So, to check how far left or right the micro:bit has been tilted we can type this:
X = accelerometer.get_x()
We should then be able to use these values in conjunction with “play tone” so it changes the sounds produced depending on movement.
The accelerometer sensor will return a value between -1024 and +1024 depending on which way the micro:bit is facing, but not all of those readings will be useful to us. We can't get the micro:bit to play a negative frequency!
We need to make sure any negative values are converted to positive values.
We can do this by using another conditional statement. If a value is < 0 (less than 0) then it must be negative and we should convert it into a positive number.
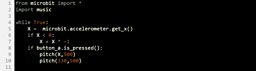
Now we've got X as our variable for frequency, all that's left to do is to replace the frequency value in pour pitch commands with it!
...or maybe not. in our original code we had two uses of the pitch command at different frequencies. If we used variable X for both pitch commands, they'd both sound the same.
Luckily for us, the micro:bit's accelerometer is detecting more than X axis movement, we have the Y and Z axis as potential sources for the frequency of our second pitch command.
Check out the image below to see how the script has changed. If you'd like to experiment with an already made version, you can download the script here by right-clicking and choosing ‘Save as’.

Taking it further
Your basic Sonic Gadget is complete! Bravo! Flash it to your micro:bit, connect up your speakers or headphones, and use your Sonic Gadget's audio blast!
If you have extra time (or if you want to challenge yourself, you master hacker you), why not give these bonus challenges a whirl?
Bonus discussion: Different input sensors
The BBC micro:bit has a number of other sensors such as compass, temperature and light. Can you use inputs from some of these other sensors to further modify your sonic device?
What kind of real world uses are there to combining sensor values like these with sound? For example, how might it be useful to combine a temperature sensor with a particular noise? Are there any other combinations of sensors and sound that could be helpful in some way?
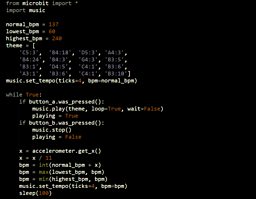
Bonus mission: Doctor Who Conductor Baton
Did you try out the Doctor Who theme-playing block earlier? Once you're familiar with how it works, try using the micro:bit's accelerometer to change its tempo. The code for this will work a little differently to the pitch-shifting script we worked on earlier:
- We need to set up a variable that will represent the default tempo for the music
- We need a forever loop that checks the x-axis position of the micro:bit
- We don't want the micro:bit to read too high or too low of a tempo - how can we make sure the lowest bpm is 60 and the highest is 240?
- How do we use that reading from the x-axis to modify the default tempo we set earlier?
You can take a look at our interpretation of the Doctor Who Conductor Baton by right-clicking here and choosing 'Save as'. Or, you can use our diagram below to help you. Happy coding!