Doctor Who Mission Sonic: Code with PXT!

Bring Sound to your Sonic Gadget!
So you've made your own Sonic Screwdriver (Or at least, some kind of Sonic Gadget). Nice! But it's not going to do anything on its own - let's get coding and bring it to life!

You've chosen to use the PXT code editor to complete this part of the mission, solid. In PXT, you can create your script by snapping together blocks of code. The different blocks are organised by type on the left side of your screen.
Our goal is to have our Sonic Gadget do the following:
- We want to activate our gadget when the A button is pressed
- When the A button is pressed, we want a sound to play!
Oh but don’t forget – the micro:bit can’t play sound on its own – you need to add some speakers or headphones first!
Don’t worry though, you can find a simple guide on how to hack your headphones here.
First up we want the program to keep checking if the A button is being pressed or not. Doing this is easy - we can use a “forever” loop. Any instructions that we put inside this loop will be executed over and over again forever (or at least, for as long as the micro:bit is powered). You can find this block in the Basic tab of the toolbox.
To allow the micro:bit to check if a button has been pressed, we can use a conditional statement. You'll find the 'if' block for that under the Logic tab.
We need to add a condition to our conditional statement. We want to check if the A button is pressed; the block for that is under the Input tab.
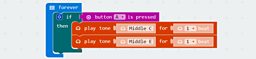
Now we need to add some sound for the micro:bit to play inside the if statement we made. You'll find it in the Music tab. The 'play tone' block has two values that can be changed, the 'tone' and the number of 'beats' that the tone should play for. Feel free to rtonker with the tone and note length until you find something that feels right to you.
The image above shows how to connect these blocks together. If you'd like to experiment with an already made version, you can download the script here by right-clicking and choosing ‘Save as’.
Bonus: Play the Doctor Who Theme!
If you feel like taking things one step further, why not have your Sonic Gadget play the Doctor Who theme! We've made a special .hex file that adds in a special new tab of blocks, the DoctorWho tab. inside you'll find a block that will play the theme, display pictures on the micro:bit's LEDs and more.
Download the Doctor Who Theme .hex file by right-clicking here and choosing 'Save as', then see what you can make with it.

Make your Sonic Gadgets respond to movement!
Well done on getting your sonic gadgets working! You're almost ready to start taking on the Dalek menace properly, but the Doctor’s sent one last coding task for you.

My database says the Sonic Screwdriver has countless different settings. It can do anything from open locked doors to blocking trolls on Snapchat; all by using the right sonic frequency. Your Sonic Gadgets are definitely noisy, but I’ll show you how to manipulate that music, mostly through movement!
We’re going to modify our Sonic Gadget to do the following:
- The micro:bit will play two tones when the A button is pressed, like before.
- When you tilt the micro:bit left and right, the pitch of the tones shift up and down.
To get this working, we'll need the accelerometer block from the Input tab. The accelerometer is a sensor built into the micro:bit and can detect movement in 3 directions called X, Y and Z. Don't worry about having to start over with a new script, we can use the one we made earlier.
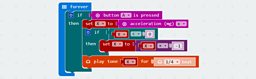
Go to the Variables tab and make a new variable called 'X'. We can now use the 'Set variable to' block with the 'acceleration (mg) X' block to create the motion detection part of our program.
But that's not going to do anything useful by itself! Let's use it to change the pitch of the 'play tone' block in our code.
The accelerometer sensor will return a value between -1024 and +1024 depending on which way the micro:bit is facing, but not all of those readings will be useful to us. We can't get the micro:bit to play a negative frequency!
We need to make sure any negative values are converted to positive values.
We can do this by using another conditional statement. If a value is < 0 (less than 0) then it must be negative and we should convert it into a positive number.
The 'play tone' block normally is represented as a musical note (like 'Middle C'), but did you know that each musical note is tied to a frequency? That frequency is a number - an ideal fit for the accelerometer readings we're getting from the micro:bit!
Try dragging the X variable we made earlier from the Variables tab to where 'Middle C' is on the 'play tone' block. Now it'll play a tone at a frequency matching the value of X.
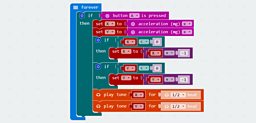
That's all well and good to control a single tone, but our original version of this script plays two different tones! No sweat though, we can use the X variable we created to dictate the second tone too.
The accelerometer doesn't just pick up movement to left and right, it can pick up other movement readings. So to dictate the pitch of the second note, why not take a reading from the Y axis also? You're going to need to create another variable from the Variables tab, but implementing it is easy! As a hint, if you right click on a block, you can duplicate it, along with any other blocks inside it.
Check out the image below to see how the script has changed. If you'd like to experiment with an already made version, you can download the script here by right-clicking and choosing ‘Save as’.
Taking it further
Your basic Sonic Gadget is complete! Bravo! Flash it to your micro:bit, connect up your speakers or headphones, and use your Sonic Gadget to conduct the Doctor Who theme.
If you have extra time (or if you want to challenge yourself, you master hacker you), why not give these bonus challenges a whirl?
Bonus discussion: Different input sensors
The BBC micro:bit has a number of other sensors such as compass, temperature and light. Can you use inputs from some of these other sensors to further modify your sonic device?
What kind of real world uses are there to combining sensor values like these with sound? For example, how might it be useful to combine a temperature sensor with a particular noise? Are there any other combinations of sensors and sound that could be helpful in some way?
Bonus mission: Doctor Who Conductor Baton
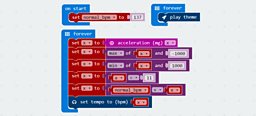
Did you try out the Doctor Who theme-playing block earlier? Once you're familiar with how it works, try using the micro:bit's accelerometer to change its tempo. The code for this will work a little differently to the pitch-shifting script we worked on earlier:
- We need to set up a variable that will represent the default tempo for the music
- We need a forever loop that checks the x-axis position of the micro:bit
- We don't want the micro:bit to read too high or too low of a tempo - how can we limit reading to between -1000 and 1000?
- How do we use that reading from the x-axis to modify the default tempo we set earlier?
You can take a look at our interpretation of the Doctor Who Conductor Baton by right-clicking here and choosing 'Save as'. Or, you can use our diagram below to help you. Happy coding!