 I'm still staying one step ahead of the blight, thanks partly to the lovely weather we had last week. Two whole trusses have now ripened.
I celebrated by knocking up a Dig In salad - sliced beetroot, tomatoes, the last of my lollo rosso and grated carrots (preparing that was a bit tricky, as my carrots have been a bit wee this year). Plus cucumber - also home grown.
At risk of sounding disloyal to Dig In, I'm actually more excited by the ripening of another tomato variety on the allotment - my 'Scotland Yellow'. I got the seed for this from Garden Organic's Heritage Seed Library, and like all the veg they have, it's a rare, old-fashioned variety, no longer available to buy anywhere.
 Garden Organic look after hundreds of these heritage varieties, growing some at their headquarters, and relying on people like me to grow others and then send saved seed back. So, I'm made up that I'll be able to save at least one tomato's-worth of Scotland Yellow seed, and do my bit towards keeping this rare breed going.
But you don't need a rare plant to make seed saving worthwhile. Seed saving gets you seeds for free, and it's environmentally sound. Plus, if you grow seed saved from plants that did well in your garden, allotment or balcony pot, it should do well too. Keep using saved seeds for a few years, and you may breed yourself a micro-variety that's specially adapted for your plot.
One word of warning - if you grew any plants from seeds described as "F1s" on the packet, any seed saved from these won't grow into the same variety. F1s are special hybrids, which usually grow fast and strongly, but don't "come true" - the plant that grows from the seed won't look like it's parent.
Here's my guide to the easy and not-so-easy candidates for seed saving:
A doddle
Squashes, marrows, tomatoes, chillis - just scrape out the seeds and leave them somewhere cool to dry. Tomato seeds are coated in a sticky goop that stops them germinating, so you need to remove that by fermenting it off first.
Peas & Beans - leave on the plant until they go dry and the pods go crispy, then store in a dry cool place
Spinach - just wait for it to go to seed, then pull up once it's covered in small seed pods and leave somewhere to dry. Give it a good beating onto newspaper to remove the seeds.
 Medium
Onions and leeks - leave in the ground until a flower (left) grows. Eventually (the whole process can take over a year), small seed pods will form all around the flower, and you can shake the seed out - it looks like tiny flakes of black grit. The bees will enjoy it in the meantime.
Broccoli, kale, pak choi - let the plant flower, then wait until many small pods form where they were. Check the seeds inside the pods every now and then, and once they turn brown, cut the stems off and leave them somewhere to dry. Break open the pods to get the seeds.
Lettuce - leave to flower, then collect pods once they've dried. Put in a paper bag and shake to get the seeds out.
Tricky
Carrots, beetroots and parsnips - these take two years before they flower and go to seed, but usually they don't get the chance because we scoff them too quickly. Carrots will often need a bit of protection to survive the winter. In the second year, they'll grow large sprays of flowers and then seeds.
If you've got more than you can use of a particular seed, a nice way of exchanging it for something you do want, and socialising at the same time, is going along to a seed swap. In the south-east, Seedy Sundays runs a yearly swap, but there are many local events - keep an eye out in local newspapers and noticeboards, or even set one up yourself. You can also swap online - try the forums below for a start. And there's absolutely loads of seed saving advice on the Garden Organic site.
Grow Fruit and Veg Magazine forum
Self-sufficientish.com forums
Vegetable Gardening Forum


 Picture the scene: rubbish gardener (me), hovers nervously over her veg patch, watching terrified as evil blight slowly but surely takes hold of her beloved tomato plants. The stems are darkening, but the tomatoes are all bright green, and as yet untouched by the wicked claw of disease that will render then black and yucksome.
  Several other tomatoes hung brown and diseased. Rubbish! But ahoy, what's that shining red and lush on the stalk? Hurrah! Four perfect tomatoes!


 Or, you can save money by rigging something up out of junk. An empty pop bottle can be turned into a waterer by piercing a couple of very small holes in the cap (left), then filling it up and screwing the cap back on.
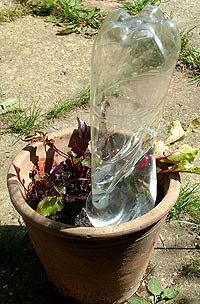


 I also decided to uproot a few of my carrots for Sunday lunch yesterday, with delicious results. Sara's
  I agree with the comment on Sara's blog - don't peel them when they're like that, or you will not only lose half the carrot - but also half of the flavour. You know what you have put on that soil, so a brushing off should be plenty!
  Secondly, and more seriously, my squash are in dire straights. A big gulp of water when I got home has revived them slightly, but I think that


