Four tips to get better results when filming in a car

Nick Skinner
BBC Wales innovation lead, series producer, Cardiff
So you’ve got to film a sequence in a car? Most directors - those of us without vast budgets anyway - stick an action camera on a suction cap, fasten it to the windscreen and work with that. But there are plenty of other ways to give your in-car shots a bit of extra oomph.
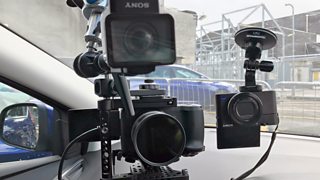
Nick's setup to compare cameras for filming in a car
But before you start - remember that whatever you do, you must ensure the car is driven safely. If you don’t, you’re not just breaking the law - you’re putting lives at risk.
The main safety points to remember are:
- Don’t rig anything which blocks the driver's view or dazzles her
- Anyone driving while filming need to remember they are driving first and filming second.
- Only do pieces-to-camera when it is safe to do so
- Pick a quiet road without difficult traffic obstacles
- Never glance to the camera for any longer than you would glance in the mirror
This is an excellent safety guide from the BBC Academy.
OK, so down to business:
Tip 1: Get the right road on the right day
Filming on a sunny day is tough. The lighting conditions can change drastically and there will be a big contrast between the car interior and the world outside.
This is what happens when you pick the wrong road on the wrong day:
The backdrop would have looked great, but plunging from bright sunlight to shady woods didn’t work on camera. Auto-exposure might help a bit if you really have to film in these conditions but it'll look a bit rough.
So pick your road wisely. Try to find a road that makes the lighting conditions fairly constant. Big wide roads in industrial estates are better than tree lined avenues - especially in the sunshine. If it must be a residential area, pick a wide, quiet street without big shadows falling across the road.
Speed humps and potholes won’t help either!
Tip 2: Use a better camera
Action cameras have revolutionised the way we film in a car - by being small, durable and, well, designed to film action. Anyone who remembers the camera operator cramped in the front of a car trying to get a decent shot on a bulky digibeta camera will know what I mean. But the days when action cams are the only alternative are long gone.
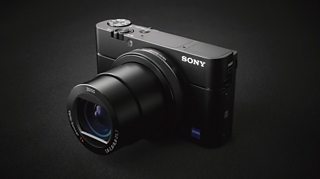
Point and shoot camera
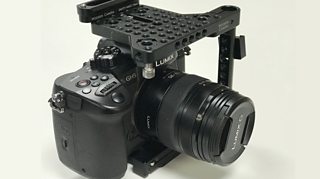
Digital SLR
DSLRs and even high end point and shoot cameras can be fixed in a windscreen and will give a much higher quality shot.
I tested this by comparing the output of a top-of-the-range action cam, a high end point and shoot camera with good manual settings and a new model DSLR.
All can be mounted on the window using a suction cap. The DSLR required a larger mount - but I found one for around £65 online, and it held like glue!
I set all three cameras running at once. These are the results:
The action camera had the advantage of being fully automatic and with its wide angle I wasn’t going to miss anything. It had good stabilisation and it would have been hard to make any serious mistakes. If you can film in 4K you can crop the shot for an HD output.
The other cameras had manual settings and I used them to expose for my face – which therefore remained pretty constant although it meant that sometimes the background would be massively overexposed.
On these cameras the colours were richer than on the action camera and the background was defocused.
With the DSLR you are more free to manipulate the shot and the technical quality will be better. You can also attach a monitor to check your settings and see better what you are filming.
Tip 3: Light your shot
Using a small light or two can really boost your shot.
Be careful not to block the view of the driver or to dazzle her. But a carefully positioned light can usually lift a shot. This is especially helpful if the background light changes. Your light will keep some level of consistency on the subject’s face. Here is a comparison:
I used small LED lights and used the action cam suction caps to hold them in place. They both cost a little over £100 although you will find much cheaper lights around. Just make sure they are balanced for daylight.
Another trick (which would probably work better in bright sunshine) is to put a white sheet over the legs of the driver to reflect light into their face. It won’t make a massive difference but every little bit of extra light helps!
Tip 4: Sound
Your pictures might be great but you’ve wasted your time if you haven’t also got good sound.
Simple cameras won’t have any sound inputs so you may be stuck with the audio you get from their built-in microphones. In some cases you’ll get away with it but often it will only be useful as guide audio in the edit. This is especially true if you are using an action camera inside a solid protective case.
If your camera doesn’t have a mic input, the solution is to attach a small mic to your phone (you can buy them online for less than £50) and record the audio into that. You can record using the filming app on your phone or get a dedicated sound recording app. Clap to give yourself a sync point between the audio and the video for your edit.
A personal mic pinned to your lapel is best, so that you’ll hear more of your voice and less of the engine. If you're using a DSLR or another camera with an audio input then you can use a huge range of audio devices. With adapters you can even record audio from more than one person in the car at the same time. However for a simple shot, why not just plug in a wired personal mic? The cable is usually long enough to stay out of shot.
Good luck!
