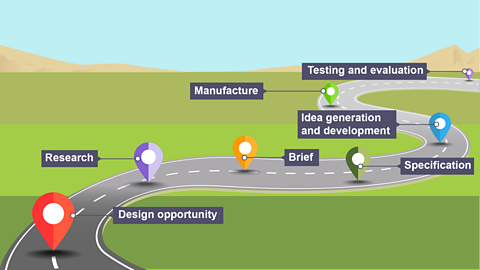
Understand the design process
The design process is like a roadmap for turning an idea into something real. It is not just a straight path; it is more like a series of loops and twists.
| Explanation | Phone battery | Losing keys | |
|---|---|---|---|
| Design opportunity | Identify a problem or need to be solved or improved. | Maybe you notice that your phone always runs out of battery and you think, "I need a better portable charger!" | Maybe you notice that people are always losing their keys. The design opportunity here is to create a solution that helps people keep track of their keys. |
| Research | Gather information on the problem or need. Explore existing solutions and consider materials and technologies that could assist. | You might look up the best battery types or read user reviews of existing chargers. | Researching key holders, studying user habits, or finding out which materials are best for durability. |
| Brief | This is a clear statement that outlines the problem, the goals and the constraints you must work within. | "Create a portable charger that’s compact, charges quickly and looks modern." | “Design a portable key holder that is easy to carry, helps users keep track of their keys and is stylish.” |
| Specification | Create a detailed list of design requirements, including dimensions, materials and performance criteria. | Dimensions, materials and features like how many charges it can provide. | Specifications for the key holder might include dimensions (must fit in a pocket), material (must be lightweight and durable) and features (must include a clip for attaching to a belt). |
| Idea generation and development | You might sketch ideas, make models, or use software to visualise them | Coming up with different designs for the key holder, like a keychain, a small pouch, or a clip-on device and then refining these ideas. | |
| Manufacture | Manufacturing involves making the product, by hand or using machines. | Once you have finalised your key holder design, you might make a prototype using 3D printing or assemble it using different parts. | |
| Testing and evaluation | Test the design, check requirements, gather feedback and suggest improvements | Testing the key holder to see if it holds keys securely, if it is easy to use and if it is durable. You might also get feedback from users to see if there are any changes needed. |
A quick overview of the design process
The design process provides us with a series of important stages during the design and development of a product or solution. This involves exploring, creating, and evaluating ideas to develop a product, to solve a specific problem or need.The process can also be considered as a design cycle. This is due to the fact that the designer should constantly evaluate and improve their design ideas repeatedly until a robust solution is developed.
The design process also isn’t exactly linear, meaning that it doesn’t have to be completed in a specific order. However, each step still plays a very important role in the process as a whole.
Normally, the process will start with a design opportunity. This could come from a client asking for a certain product to be manufactured, or even the engineer themselves spotting a gap in the market or an unfulfilled need.
Research is a very important stage in the design process. Research will involve looking closely at the design opportunity to clarify exactly what the client needs, or what exactly is the perceived gap in the market.Research will also help gain new knowledge into areas that will help design the solution.Some example areas of research may include: analysis of similar solutions, investigation of suitable materials, consideration of suitable manufacturing processes.
Once you have completed your research, the next stage should be to form a design brief.
A design brief is a short outline of the key details of a design project, including the goals, deliverables, and even a visual direction. It can then be used as a reference throughout the rest of the process.
The next stage of development is completing a design specification. This should be a detailed list of requirements for your design. It should also list the issues that your design plans to address.
Some examples of what should be included in your design specification are: size, materials, cost, operation, appearance/aesthetics.You can then reference back to your design specification throughout the rest of the design process.
The next stage of the design process is idea generation. At this point in the process you can come up with your possible designs/solutions to the initial design brief.This should be done while referencing your design specification and the completed research throughout. A range of different designs developed using sketches and drawings with annotations will help you choose the best solutions.
Once you have completed the idea generation stage you will then have to decide on your final design. This should be based on an idea you have selected from your generated ideas.You might create a model to help refine how your design looks and operates. Models can be made from card or cheaper woods. Models can be tested to find design refinements.Working drawings should be made either by hand or using computer aided design (CAD) at this stage. Accurate dimensions and details of materials should be included to help manufacture your developed design idea.
The next stage in the process is manufacture. Manufacture will use the information in your working drawing and the tools, processes, and materials available in your Technology and Design workshop.
Discuss and analyse the design process
Analysing the design process
Analysing the design process involves evaluating each step to understand its effectiveness and identify areas for improvement.
| Analysis | Question to ask | |
|---|---|---|
| Design opportunity | Evaluate how clearly the problem or need is defined. Was it a genuine problem? Did you identify the right target audience? | Did you consider various perspectives and potential impacts? |
| Research | Assess the depth and relevance of your research. Did you gather comprehensive information? Were your sources reliable and varied? | Did your research uncover key insights and trends? |
| Brief | Review how well the brief outlines the objectives and constraints. Is it specific and clear? Does it align with the identified design opportunity? | Does the brief address all the essential aspects of the problem? Are the goals realistic and achievable? |
| Specification | Evaluate the accuracy of your specifications. Are they feasible and measurable? | Are the specifications detailed enough to guide the design process? Do they cover all necessary criteria (performance, safety, usability)? |
| Idea generation and development | Were the ideas diverse and innovative? Did you effectively develop and refine them? | How many ideas did you generate? Were the ideas tested and refined based on feedback or prototypes? |
| Manufacture | Did the final product meet the specifications? | Did the produced item match the design specifications? |
| Testing and evaluation | Evaluate the thoroughness of the testing and the usefulness of the feedback. How well did the design perform in real-world conditions? | What methods were used for testing? Did the testing reveal any issues or areas for improvement? How was feedback gathered and used? |
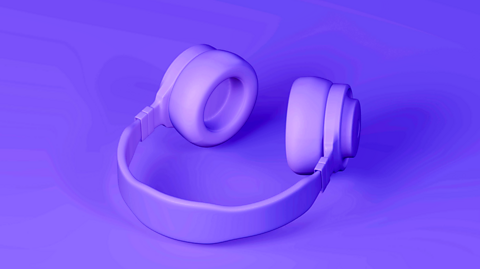
Analysing a product
Analysing cordless overhead earphones with a focus on ergonomics and aesthetics.
Ergonomics in earphones involves designing them for comfortable long-term wear. A well-designed pair of earphones should look good and feel comfortable. A sleek design with adjustable, padded elements ensures that the product is both attractive and functional.
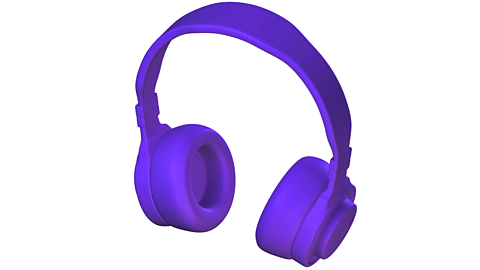
Ergonomics
- Padding on the ear cups
- Adjustable headband
- Overall weight of the earphones
- Earphones with memory foam ear cushions and an adjustable, padded headband tend to be more comfortable, especially for extended use. If they are too heavy or have poorly designed padding, they can cause discomfort or even pain after a while.
- Proper fit is crucial for both comfort and sound quality. Earphones should be adjustable to fit different head sizes and shapes. Poor fit can lead to discomfort and poor audio performance.
- Earphones with a flexible and adjustable headband and rotating ear cups can accommodate various head shapes and sizes, improving the overall user experience.
- Ease of use. Controls for volume and playback should be easy to reach without causing strain.On-ear controls that are easily distinguishable and positioned for quick access enhance usability. Controls that are too small or poorly placed can be frustrating.
Aesthetics
- The design, color and overall look of earphones can make them more attractive to users.
Sleek, modern designs with a choice of colors or customisable elements can appeal to style-conscious consumers. - The materials used affect both the appearance and the perceived quality of the earphones. High-quality materials can give a more expensive look and feel.
- Distinctive design features, like a recognisable logo or unique color schemes, help in building a brand’s image and can attract loyal customers.
Understand the non-linear nature of the design process
The iterative process in design
Iterative design
Designing a product for a client can be done in several ways.Manufacturers cannot risk investing large amounts of money into the production of a product that has not had adequate design, modelling, testing, prototyping and evaluation.
Analysis
Starting with a design brief a designer may come up with a good idea that solves a problem. Using an iterative design process, a model can be made from a design sketch and then tested. The test results may suggest failures andmodifications to the design. These changes are evaluated, and then the cycle begins again - until the best solution to the problem is found.
Sketching design ideas
This involves creating a series of freehand sketches of design ideas that may help solve the problem in the design brief. These could be different from each other or developments of an original idea.
Modelling
Modelling ideas in card, paper, clay or other materials can create a cheap and quick way to do initial trials with a product. Using an easy to modify material provides a good way of seeing how a product looks and works, eg checking handles are in the right place or parts fit together well. Taking photographs or video throughout this can show development.
Testing
Once a model has been made it can be tested in a variety of ways:
- destructive testing - tests the product to its extreme to see what conditions it can tolerate before being destroyed, to help decide on the best materials and construction methods to use
- non-destructive testing - tests the model to identify areas of weakness without destroying it, to test the function of the product and highlight any unexpected design flaws
- market testing - tests the product with its target market to give feedback on performance and design
Evaluating
The data that is gathered from the testing of a model can be in the form of questions answered or tables of measurements or results. These can then be analysed and used to improve aspects such as:
- aesthetics
- function
- safety
- strength
Evaluation is crucial in the design process as it can highlight any modifications that need to be made at the next stage. It is also a valuable point at which to consider the product against the original design specification and ensure the client or target market’s needs are met.
Modification
From the evaluation, a designer can revisit the models and design ideas to make improvements to:
- performance
- style
- function
- cost
Becoming fixated on a particular idea can become an issue when trying to develop a new solution to a design problem. This can be avoided by:
- collaboration
- feedback from user groups
- testing a product
Use communication methods in design
Why Communication Methods Matter
Once you have your design, you need to share it clearly with others. That is where communication methods come in. Each method helps you present your ideas effectively.
Freehand Sketching
Quick drawings to explore and share your initial ideas. It is like doodling your thoughts on paper.
Presentational Drawings
Detailed and polished visuals showing how your final product will look. Think of it as a high-quality poster of your design.
Working Drawings
Precise technical drawings with measurements.
Mood Boards
Collages of images, colors and textures to capture the style and feel of your project. Imagine a Pinterest board that helps set the mood for your design.
Physical Mock-ups / Models
Prototypes of your design. These help you see and touch your idea in a real-world form, making it easier to assess and refine.
Computer-Aided Design (CAD) Virtual Modelling
Using software to create detailed 3D models of your design. It is like having a digital version of your product that you can manipulate and perfect.
